Unit Testing Static Libraries with Kiwi for iOS Development

I've been playing with Kiwi and I'm trying some BDD (Behavior Driven Development) for a new static library component I wanted to build. I began with a new Xcode project using the Static Library template, but ran into issues with the difference between "logic tests" and "application tests". In short, all my non-UIKit code worked great, until I started to test my UIKit related functions.

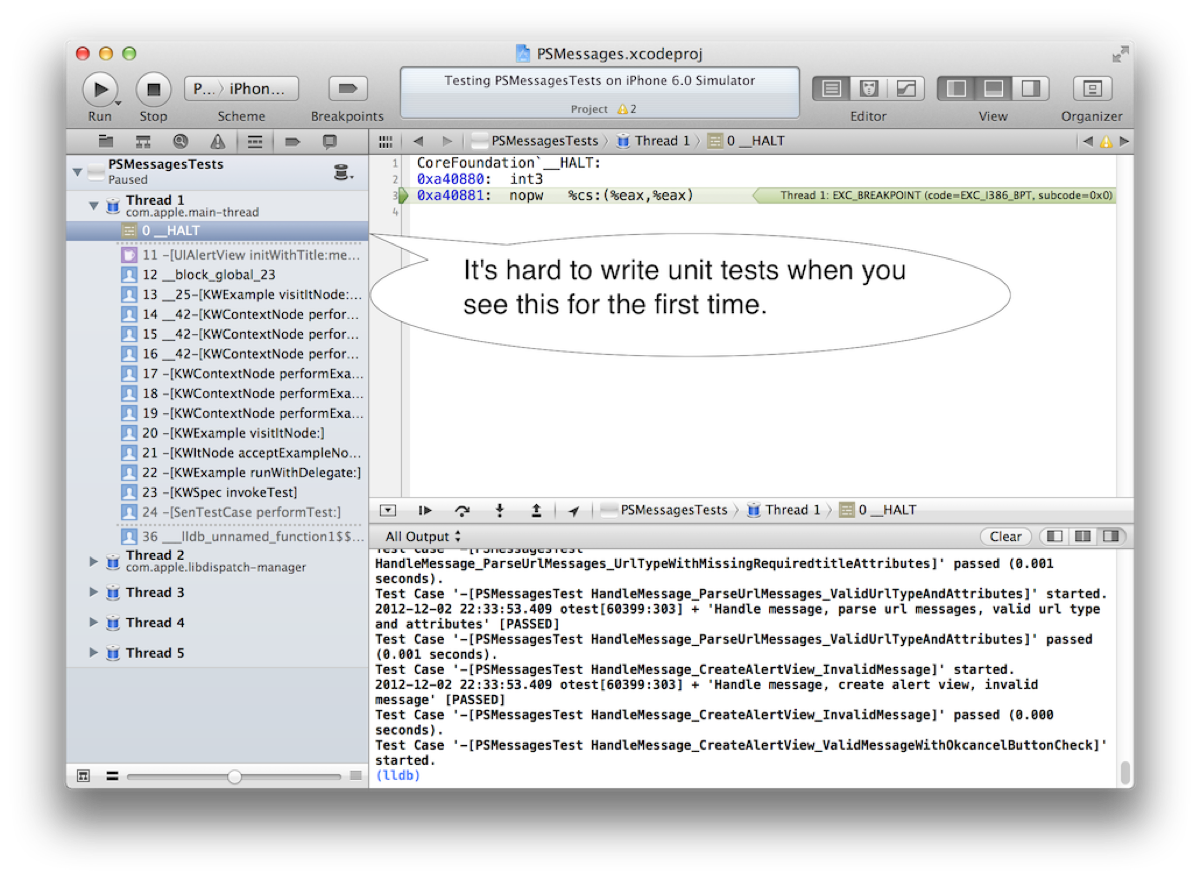
The code crashed and makes it frustrating to write unit tests. If you've never experienced it before, it'll make your unit test experience unproductive. To solve the issue you'll need to create a new target (empty iOS application) and include unit tests. Xcode will automagically setup the unit tests to be "Application Tests" instead of "logic tests."

EmptyApp

#0 0x00a40881 in __HALT () #1 0x0097a971 in _CFRuntimeCreateInstance () #2 0x01337cc1 in GSFontCreateWithName () #3 0x05c32281 in UINewFont () #4 0x05c323ec in +[UIFont systemFontOfSize:traits:] () #5 0x05c32438 in +[UIFont systemFontOfSize:] () #6 0x05be24ee in +[UILabel defaultFont] () #7 0x05be32e5 in -[UILabel _commonInit] () #8 0x05be3424 in -[UILabel initWithFrame:] () #9 0x05e7cc67 in -[UIAlertView(Private) _createTitleLabelIfNeeded] () #10 0x05e8b4b9 in -[UIAlertView setTitle:] () #11 0x05e8bb37 in -[UIAlertView initWithTitle:message:delegate:cancelButtonTitle:otherButtonTitles:] () #12 0x02605831 in __block_global_23 at /Users/paulsolt/dev/Photo-Slide-Show/PSMessages/PSMessagesTests/PSMessagesTest.m:165 #13 0x0261b584 in __25-[KWExample visitItNode:]_block_invoke_0 at /Users/paulsolt/dev/Photo-Slide-Show/Frameworks/Kiwi/Kiwi/KWExample.m:220 #14 0x0261a11e in __42-[KWContextNode performExample:withBlock:]_block_invoke_0 at /Users/paulsolt/dev/Photo-Slide-Show/Frameworks/Kiwi/Kiwi/KWContextNode.m:116 #15 0x0261a11e in __42-[KWContextNode performExample:withBlock:]_block_invoke_0 at /Users/paulsolt/dev/Photo-Slide-Show/Frameworks/Kiwi/Kiwi/KWContextNode.m:116 #16 0x0261a11e in __42-[KWContextNode performExample:withBlock:]_block_invoke_0 at /Users/paulsolt/dev/Photo-Slide-Show/Frameworks/Kiwi/Kiwi/KWContextNode.m:116 #17 0x0261a03e in -[KWContextNode performExample:withBlock:] at /Users/paulsolt/dev/Photo-Slide-Show/Frameworks/Kiwi/Kiwi/KWContextNode.m:132 #18 0x0261a05d in -[KWContextNode performExample:withBlock:] at /Users/paulsolt/dev/Photo-Slide-Show/Frameworks/Kiwi/Kiwi/KWContextNode.m:135 #19 0x0261a05d in -[KWContextNode performExample:withBlock:] at /Users/paulsolt/dev/Photo-Slide-Show/Frameworks/Kiwi/Kiwi/KWContextNode.m:135 #20 0x0261b539 in -[KWExample visitItNode:] at /Users/paulsolt/dev/Photo-Slide-Show/Frameworks/Kiwi/Kiwi/KWExample.m:216 #21 0x0261a553 in -[KWItNode acceptExampleNodeVisitor:] at /Users/paulsolt/dev/Photo-Slide-Show/Frameworks/Kiwi/Kiwi/KWItNode.m:41 #22 0x0261ae22 in -[KWExample runWithDelegate:] at /Users/paulsolt/dev/Photo-Slide-Show/Frameworks/Kiwi/Kiwi/KWExample.m:113 #23 0x02618c95 in -[KWSpec invokeTest] at /Users/paulsolt/dev/Photo-Slide-Show/Frameworks/Kiwi/Kiwi/KWSpec.m:105 #24 0x2010405b in -[SenTestCase performTest:] () #25 0x201037bf in -[SenTest run] () #26 0x2010792b in -[SenTestSuite performTest:] () #27 0x201037bf in -[SenTest run] () #28 0x2010792b in -[SenTestSuite performTest:] () #29 0x201037bf in -[SenTest run] () #30 0x201063ec in +[SenTestProbe runTests:] () #31 0x0072f5c8 in +[NSObject performSelector:withObject:] () #32 0x00002342 in ___lldb_unnamed_function11$$otest () #33 0x000025ef in ___lldb_unnamed_function13$$otest () #34 0x0000268c in ___lldb_unnamed_function14$$otest () #35 0x00002001 in ___lldb_unnamed_function4$$otest () #36 0x00001f71 in ___lldb_unnamed_function1$$otest ()

Solution

1. Add a new target with it's own unit tests. Creating unit tests with a "static library" template gives you "logic tests", while creating unit tests with a "iPhone application" gives you "application tests." The difference is that you can't use UIKit classes in logic tests, but you can in application tests.

EmptyApp

2. In an application test, the runloop of the iPhone app starts, which means all the UIKit goodies are setup. The bad news is that it loads all the default state from your previous app runs. You might need to write some methods to cleanup or reset state. (GHUnit is nice because it's more sandboxed)

3. If you're using Kiwi you'll have to setup the Kiwi environment (library/header paths) again for the application tests.
ApplicationUnitTest

Linking to a Facebook Page from an iOS App

The Facebook app broke the old way of creating an iOS facebook page link. If the app isn't installed the old facebook link works, but when it is installed it just opens the Facebook app to the default page. Fix your app links to Facebook using this url format:

Old iOS Facebook Page Link:

http://www.facebook.com/PhotoTableApp

New iOS Facebook Page Link:

https://m.facebook.com/PhotoTableApp?_rdr

The only downside is that the user would have to login via the mobile website in order to "like" your Facebook page. It's certainly better than just seeing the "default" screen in the app. I'm not sure if the new Facebook SDK 3.1 fixes any of these issues, but I haven't seen a solution on Stackoverflow.com


iPhone Link to Facebook Page fails with App

Linking to a facebook page doesn't work from iOS if the new Facebook app is installed.

iPhone Link to Facebook Page Works

Linking to the mobile Facebook page with the ?_rdr flag fixes the issue.

Duplicate Code Signing on Xcode with Any iOS SDK

Working with Xcode code signing is a pain. You may have encountered a situation where there are more than two code signing identity's in Xcode. This means that you potentially have to change four different code signing settings to update your app, rather than just two. I think this is cruft from upgrading to the newest Xcode version or something. Here's what it looks like and here's how to fix it. It's very annoying when developing and testing with adhoc and app store builds.


Code signing in Xcode 4


The issue is visible with the "Any iOS SDK" seen as a subitem to the Debug and the Release builds. Things won't work correctly if the two don't match in my experience. So I end up having to change two at a time.

Solution

You can close Xcode or keep it open. It seems to work either way before you start the next steps.

1.Open your project folder in finder. (Right click project in Xcode and choose "Show in Finder")

Show in finder

2. Right click on the Xcode project file in Finder -> "Show Package Contents"

Xcode project Show package contents

3. Right click on the project.pbxproj and choose "Open With" -> "TextEdit"

Xcode project in Textedit

4. Search for "Sign" and delete any lines that look like the following. Xcode will regenerate, so don't worry about deleting them. I believe the first two are the root of the problem.

"CODE_SIGN_IDENTITY[sdk=iphoneos*]" = "iPhone Developer";

"CODE_SIGN_IDENTITY[sdk=iphoneos*]" = "iPhone Developer";

CODE_SIGN_IDENTITY = "iPhone Developer";

Textedit code sign identity

5. Open the project settings in Xcode and see the duplicate "Any iOS SDK" are removed and Xcode regenerated the default Code Sign Identities.

Fixed code sign duplicates

6. Update with your credentials for Debug/Release.

Update code sign

Enjoy.

iPhone Unit Testing Explained - Part II

Xcode 4 has drastically improved iPhone unit testing and Mac unit testing from my previous post, iPhone Unit Testing Explained - Part I Creating the unit testing target is easy and you can start writing test code in under 5 minutes.

The biggest hassle in testing is setting up the project correctly, and Xcode 4 makes it simple. If you read Part I, I pushed for GHUnit because of the GUI interface, but now Xcode's built in testing is enough to get you started. If you need a GUI, add GHUnit later, but start writing your tests today, since they're compatible with GHUnit when you decide to integrate with it.

Testing is important to start from the beginning or you will never have the motivation to write the tests unless your boss demand

Getting Started

To start writing unit tests you have two options, either create a new project with unit tests or add unit tests to an existing project.

New Project with Unit Tests

Create a new project and make sure the checkbox is enabled for unit tests.


New Xcode 4 Project with Unit Tests

Add Unit Tests Target to Existing Projects

Add a unit test target to your project by clicking on your Project (top left) -> Add Target (bottom middle) -> iOS -> Other -> Unit Testing Bundle.


Add Unit Tests to Existing Xcode Project

(Optional) Share the Target and Testing Scheme

If you add a unit test target, you'll most likely want to share your testing scheme with your team over version control (git, svn, etc.) Otherwise you're teammates will have to setup for themselves.

Goto Editor -> Manage Schemes -> Click Shared next to the Unit Test


Share Xcode Schemes with Teammates

Adding Resources

When you want to test code or import resources like images or data files you'll need to tell the testing target about the resources. There are two ways, you can do it when you first add the resource to the project or you can do it by editing the Build Phases for the unit test target.


Adding New Resources to the Unit Test Target

Click on File -> Add Files to "TestProject" -> Click on the checkbox on unit test target and Copy items


Copy Items and add to Unit Test Target in Xcode 4

Adding Existing Resources to the Unit Test Target

Click on your project "TestProject" -> Build Phases -> Expand one of three (Compile Sources, Link Binary With Libraries, or Copy Bundle Resources)


Build Phases for unit test in Xcode 4

Resource Paths are Different!

Many assumptions that your bundle is the main bundle will cause problems when testing. (Especially when adding tests to existing code) Look at the difference in bundles, the main bundle isn't what you'd expect in a unit test.

NSString *mainBundlePath = [[NSBundle mainBundle] resourcePath];

NSString *directBundlePath = [[NSBundle bundleForClass:[self class]] resourcePath];

NSLog(@"Main Bundle Path: %@", mainBundlePath);

NSLog(@"Direct Path: %@", directBundlePath);

NSString *mainBundleResourcePath = [[NSBundle mainBundlepathForResource:@"Frame.png" ofType:nil];

NSString *directBundleResourcePath = [[NSBundle bundleForClass:[self class]] pathForResource:@"Frame.png" ofType:nil];

NSLog(@"Main Bundle Path: %@", mainBundleResourcePath);

NSLog(@"Direct Path: %@", directBundleResourcePath);

Output:

Main Bundle Path: /Applications/Xcode.app/Contents/Developer/Platforms/iPhoneSimulator.platform/Developer/SDKs/iPhoneSimulator5.1.sdk/Developer/usr/bin

Direct Path: /Users/paulsolt/Library/Developer/Xcode/DerivedData/PhotoTable-dqueeqsjkjdthcbkrdzcvwifesvl/Build/Products/Debug-iphonesimulator/Unit Tests.octest

Main Bundle Path: (null)

Direct Path: /Users/paulsolt/Library/Developer/Xcode/DerivedData/PhotoTable-dqueeqsjkjdthcbkrdzcvwifesvl/Build/Products/Debug-iphonesimulator/Unit Tests.octest/Frame.png

Problem: My Unit test has a nil image, data file, etc. Why?

The unit test doesn't use the same bundle for resources that you're accustomed to when running an app. Therefore, the resource we're trying to load cannot be found.  You'll need to make changes to the code to support testing external resources (images, data files, etc). For example the following code

- (UIImage *)resizeFrameForImage:(NSString *)theImageName {
UIImage *image = [UIImage imageNamed:theImageName];
// ... do magical resize and return
return image;
}

Solution 1: Change the function parameters

Functions like these are semi-black boxes that aren't ideal for testing. You want access to all your inputs/outputs, especially if we're working with any kind of file resource. To fix it, just pass in the resource from the unit test, rather than having the function load it from a NSString object.

- (UIImage *)resizeFrameForImage:(UIImage *)theImage {
// ... do magical resize and return
return theImage;
}

Solution 2: Change the resource loading inside the function

If you need to load the resource in the function, you can alternatively change the way it is loaded. You need to stop using UIImage's imageNamed: method and switch to imageWithContentsOfFile: This way you can pass in the resource with the correct path, however it'll change logic elsewhere in your app.

- (UIImage *)resizeFrameForImage:(NSString *)theImagePath {
UIImage *image = [UIImage imageWithContentsOfFile:theImagePath];
// ... do magical resize and return
return image;
}

Solution 3: Load resources using the bundle for the current class

- (UIImage *)resizeFrameForImage:(NSString *)theImageName {
// Note: There are several ways you can write it, but make sure you include
//  the extension or you'll have trouble finding the resource
// 1. NSString *imagePath = [[NSBundle bundleForClass:[self class]] pathForResource:@"Image.png" ofType:nil];
// 2. NSString *imagePath = [[NSBundle bundleForClass:[self class]] pathForResource:@"Image" ofType:@"png"];
NSString *imagePath = [[NSBundle bundleForClass:[self class]] pathForResource:theImageName ofType:nil];
UIImage *image = [UIImage imageWithContentsOfFile:imagePath];
// ... do magical resize and return
return image;
}

My First Test

Code completion in Xcode will make writing tests easy. To test different things you'll use the following macros:

  • STAssertNotNil(Object, Description);
  • STAssertEquals(Value1, Value2, Description);
  • STAssertEqualObjects(Object1, Object2, Description);

Example: MyTest.m

@implementation TestImagePrintHelper
- (void)setUp
{
[super setUp];
// Set-up code here.
}
- (void)tearDown
{
// Tear-down code here.
[super tearDown];
}
- (void)testName {
NSString *testFirstName = @"Paul";
STAssertEqualObjects([person firstName], testFirstName, @"The name does not match");
}
@end

The STAssertEqualObjects macro will invoke the object's isEqual method, make sure you write one. See the section below. If you used the STAssertEquals it will test for primitive/pointer equality, not object equality.

Testable Code

Writing testable code requires that you add some additional functions that might feel optional before you decided to start testing.

1. Create a isEqual method for your class.

Most of the time you'll want to compare if the object is the correct object. This always requires that you write an isEqual method, otherwise you'll be using the NSObject isEqual test and it'll compare address pointers for the objects.

Example: Person.m

- (BOOL)isEqual:(id)other {
if (other == self) { // self equality, compare address pointers
return YES;
}
if (!other || ![other isKindOfClass:[self class]]) { 
// test not nil and is same type of class
return NO;
}
return [self isEqualToPerson: other]; // call our isEqual method for Person objects
}
- (BOOL)isEqualToPerson:(Person *) other {
BOOL value = NO;
if (self == other) { // test for self equality
value = YES;
 } elseif([[selffirstName] isEqualToString:[other firstName]] &&
[self age] == [other age]) {
// Add any other tests for instance variables (ivars) that need to be compared
value = YES;
}
return value;
}

2. Create a description method for your class.

This is what will output on the command line, rather than the objects memory address. It can be also called when you decide to print the value in a tests

Example: Person.m

- (NSString *)description {
return [NSStringstringWithFormat:@"Person Name: %@ Age: %d", [self firstName], [self age]];
}

Example: Test using the description method, and we'll see the first name and age printed like it was formatted in our description method.

STAssertEqualObjects([personfirstName], testFirstName, @"The name does not match %@", person);

Further reading in Apple's Unit Testing Guide is available. Now you have the basics for unit testing. The next part will provide an example project using resources and providing unit tests.

(Part III: Coming Soon)